
TL;DR
Moving your rig into a closet or away from your workspace is the most effective way to cut noise. Proper placement, sealing gaps, and ventilation are key. Foam alone won’t block sound, but good placement and sealing make a huge difference.
Ever wonder why that tiny closet might be your best friend for recording or reducing noise? The secret isn’t just slapping foam panels everywhere. It’s about where you put your gear, how you treat gaps, and how you handle heat. Moving your rig out of sight and earshot often beats fancy absorption tricks—by a long shot.
If you’re tired of noisy workstations or noisy neighbors, this guide will show you how to tame sound with simple, effective strategies. From building a portable booth to optimizing placement, you’ll learn why the smartest move is often just putting space between you and the source of noise.
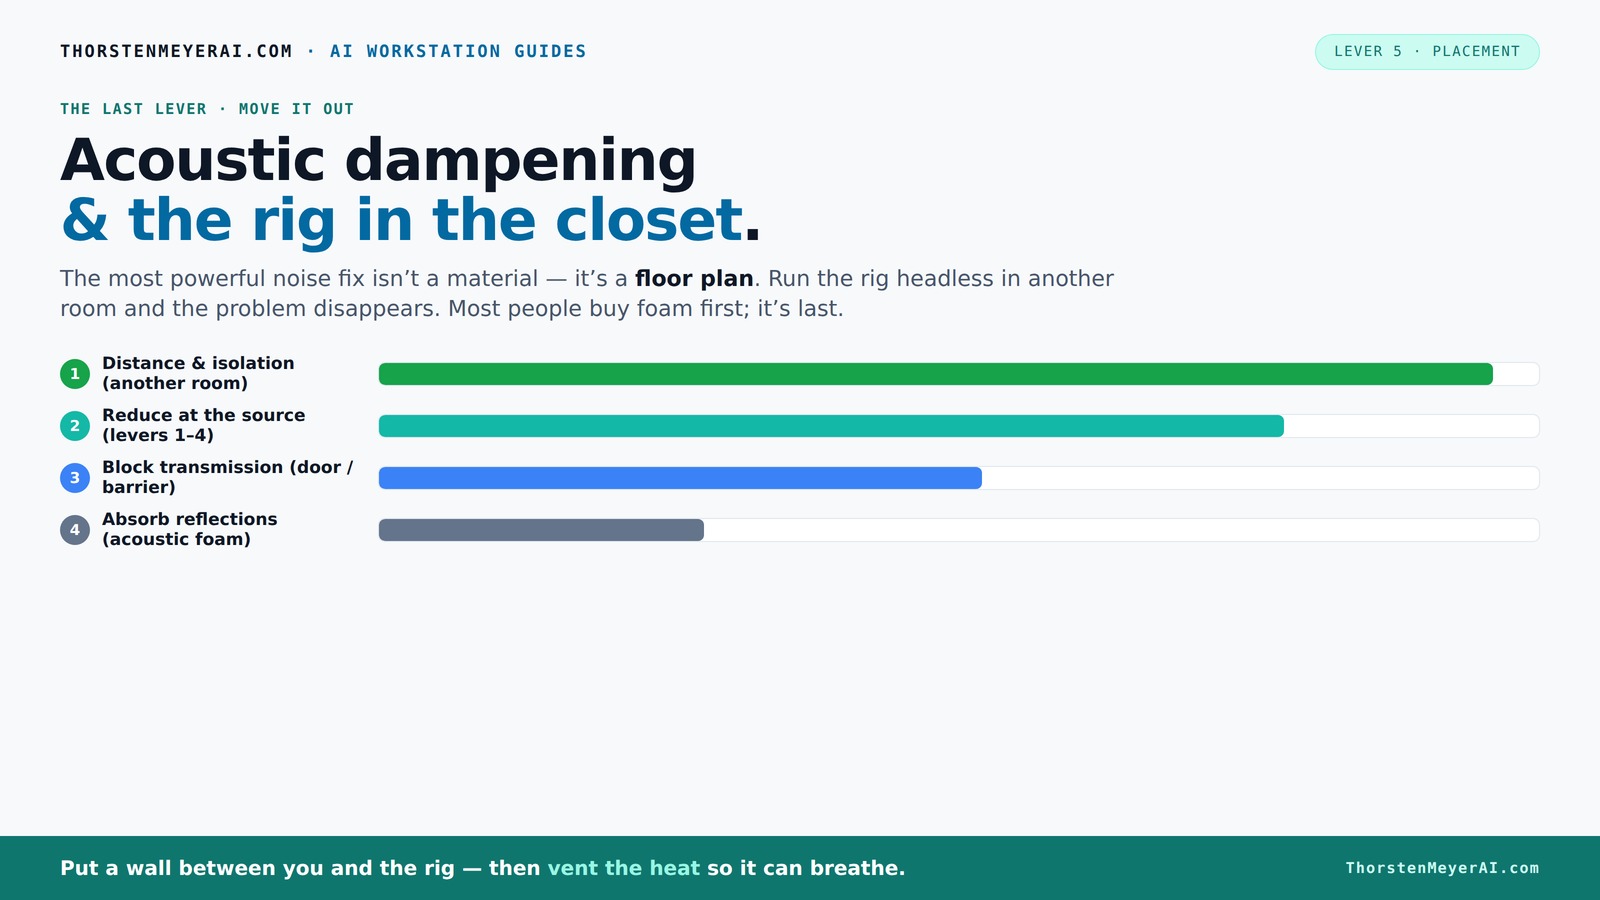
Acoustic dampening
& the rig in the closet.
The most powerful noise fix isn’t a material — it’s a floor plan. A rig you can’t hear because it’s in another room beats any amount of foam. Tap the approaches in Part 1 to see what actually works.
(another room)
(levers 1–4)
(door / barrier)
(acoustic foam)
Contain the noise, not the heat
Key Takeaways
- Relocating your rig away from your workspace is the most effective noise reduction method.
- Proper ventilation in a closet rig prevents heat buildup and hardware overheating.
- Acoustic dampening controls echoes, but real soundproofing requires sealing gaps and dense barriers.
- Place absorption materials at reflection points—behind the mic, ceiling, and side walls—for clearer recordings.
- Sealing gaps around doors and cracks dramatically cuts sound leaks, improving overall noise control.
soundproofing foam panels for recording studio
As an affiliate, we earn on qualifying purchases.
As an affiliate, we earn on qualifying purchases.
Why Moving Your Rig Is the Biggest Noise Fix You Can Do
The most powerful way to reduce noise isn’t adding foam or panels. It’s simply moving your machine away. Think of it like a loud neighbor—if they’re behind a wall or across town, they stop bothering you. Same with your rig.
Connecting to your AI workstation over the network means you don’t need it next to you. A closet on the other side of the house or a basement room can keep the noise out of your workspace. This approach cuts noise at the root, eliminating the need for complicated treatment.
Imagine working calmly at your desk, while your GPU roars away in a closet. You hear nothing. Your network connection handles the rest. The key is a good wired link and proper ventilation—more on that later.
portable acoustic isolation booth
As an affiliate, we earn on qualifying purchases.
As an affiliate, we earn on qualifying purchases.
The 'Rig in the Closet' Setup: How to Do It Right Without Cooking Your Hardware
Placing a high-powered machine in a closet sounds perfect—quiet and out of sight. But heat is the enemy. A sealed box traps hot air, and your GPU can cook itself in a few hours.
The secret? Ventilation. You need at least passive vents or, better yet, a quiet exhaust fan pulling hot air out. For serious setups, consider a purpose-built soundproof cabinet with ducted airflow and temperature controls. They balance soundproofing with cooling, keeping your hardware happy while silencing noise.
Think of it as a tiny, controlled environment—like a miniature data center. Proper airflow prevents overheating, while acoustic lining muffles the noise. Check out [this guide](https://thorstenmeyerai.com/reduce-heat-noise-ai-workstation/) for detailed airflow and cooling options.
soundproof door seal kit
As an affiliate, we earn on qualifying purchases.
As an affiliate, we earn on qualifying purchases.
Acoustic Dampening vs. Soundproofing: What’s the Difference and What Matters Most
People often confuse dampening with soundproofing. Acoustic dampening absorbs sound reflections inside a space—think of it as softening echoes. For more on this, see this guide on acoustic dampening. Soundproofing, on the other hand, blocks sound from leaking out or in. It’s about mass, sealing gaps, and barriers.
In a tiny closet, your goal is to control reflections for better recordings and reduce leaks to keep noise down. Using foam panels, blankets, or rugs mainly dampens echoes, but doesn’t stop sound from escaping through cracks or the door.
Understanding this distinction is crucial because it influences your approach. Dampening materials are easier and cheaper to install and can significantly improve recording quality by reducing harsh reflections. However, they won’t prevent sound from escaping if gaps aren’t sealed. For true isolation, you need to combine soft materials with sealing and possibly heavier barriers. This means weighing tradeoffs: soft materials are inexpensive and easy to implement but less effective at stopping noise leaks, while barriers and sealing are more involved but provide better isolation. The key is to match your goals—if you want clear recordings, focus on dampening; if you need silence from outside noise, prioritize sealing gaps and adding dense barriers.
studio gear noise reduction enclosure
As an affiliate, we earn on qualifying purchases.
As an affiliate, we earn on qualifying purchases.
Where to Place Acoustic Treatment for the Best Recordings
Placement is king. If you want your voice to sound focused and clear, treat the surfaces that reflect sound directly back at your microphone. Learn more about optimal acoustic treatment placement at this site.
Start by identifying the main reflection points: behind you, the ceiling, and side walls. Use a mirror to find where sound bounces back—if you see your reflection in the mirror from the mic position, that’s a prime spot for treatment.
In a tiny closet, coverage matters. Cover walls, ceiling, and the door if it leaks sound. Soft materials like foam panels, blankets, or even thick rugs absorb early reflections and tame harshness. For example, hanging blankets from curtain rods around your recording spot can drastically improve clarity.
Proper placement of acoustic materials ensures that reflections are minimized at the source of your recordings. This targeted approach directly improves vocal clarity and reduces harshness, making your recordings sound more professional. Overlooking reflection points means wasted effort—materials placed in the wrong spots won’t improve your sound. Think of it as strategic furniture placement in a room; the right spots make all the difference for sound quality.
Sealing Gaps and Doors: The Low-Hanging Fruit for Noise Control
Sound leaks through cracks, gaps, and unsealed doors. The simplest fix? Weatherstripping or acoustic door seals. They turn a leaky door into a barrier that keeps noise contained.
Think of your door as the weak link. Adding a moving blanket or heavy curtain over it can cut noise significantly. Seal all cracks around the frame with acoustic sealant or caulk to prevent sound from sneaking out.
In small closets, even tiny gaps can cause big leaks. Proper sealing makes your treatment more effective and can turn a noisy space into a quiet refuge.
Sealing gaps isn’t just about blocking sound; it also improves overall energy efficiency and prevents drafts, which can affect your equipment’s temperature. For more tips on sealing and noise control, visit this resource.
Bass Traps and Low-End Control in Tiny Closets: Do They Matter?
Small closets can create booming low frequencies—standing waves and low-end buildup—that muddy your recordings. Bass traps or thick absorption panels help tame this problem. Find out more about effective low-end control at this site.
In tiny spaces, bass frequencies bounce around easily. Using broad, thick panels or placing bass traps in corners can soak up these low frequencies. If your recordings sound boomy or muffled, consider adding these traps.
For example, a YouTuber found that adding foam bass traps in the corners of a closet reduced low-end muddiness by 50%. It’s a small investment with a big payoff.
Low-end issues stem from the room’s dimensions and reflective surfaces amplifying certain frequencies. Bass traps work by absorbing these problematic frequencies before they bounce back and create standing waves. Proper placement—especially in corners where low frequencies tend to accumulate—maximizes their effectiveness. While adding bass traps is more involved than placing foam panels, it’s often worth the effort in small spaces where every bit of clarity counts. Ignoring bass response can leave your recordings muddy and indistinct, so addressing low-end control is a smart move for professional-sounding results.
DIY Ideas for a Cheap, Portable Closet Studio
Building a closet booth doesn’t have to break the bank. Use blankets, foam panels, and cheap mounts to create a flexible, removable setup. Think of it as a temporary studio that you can pack up and move.
For instance, hanging blankets from curtain rods or tacking foam panels to walls creates a quick sound shield. Using a portable closet frame or a collapsible fabric booth offers even more mobility.
Many creators swear by layering soft materials—blankets, rugs, foam—to get a decent sound. It’s all about coverage and placement, not expensive gear.
By combining affordable materials and simple DIY techniques, you can craft an effective recording environment that’s portable and adaptable. The key is to focus on covering reflective surfaces and sealing gaps, which makes even cheap materials surprisingly effective. This approach offers flexibility for different spaces and needs, allowing you to upgrade or move your setup without hassle or cost.
Frequently Asked Questions
Is a closet booth soundproof or just acoustically treated?
A closet booth mainly controls reflections and reduces sound leaks but isn’t fully soundproof. True soundproofing requires heavy barriers, sealing, and mass to block outside noise completely.Where should I place the microphone in a closet setup?
Position your mic at the reflection point—usually about 6-12 inches from your mouth and facing a soft surface. Place it away from walls and corners to avoid harsh reflections and low-end buildup.Do I need bass traps in a tiny closet?
Yes, if you notice a boominess or muddiness in your recordings, adding bass traps in the corners can help tame low frequencies and improve clarity.How do I stop sound from leaking through the door?
Seal gaps with weatherstripping or acoustic door seals. Hanging a heavy blanket over the door also helps cut noise leaks. Proper sealing makes a huge difference.What’s the cheapest way to build a closet rig?
Use blankets, foam panels, and DIY mounts to create a removable, effective setup. Layer soft materials over hard surfaces and seal gaps for quick, budget-friendly noise control.Conclusion
Remember, the biggest noise fix is space—literally. Moving your rig out of your workspace often solves more problems than foam panels ever will. Pair that with smart placement, sealing gaps, and proper ventilation, and you get a quiet, cool, and effective setup.
So next time you think about soundproofing, ask yourself: can I just put this somewhere else? Often, that’s the best move.